Tuesday, October 25, 2011

Festive Halloween Centerpiece

It's here! It's here!
If your stopping by from the Creepy Crawl welcome! If you not then be sure to check back and follow along as we peruse the blogs of 6 special gals with special talents for all things creepy.
So glad to have you stop by!
I was beyond honored when Marilyn asked me to be a part of the Creepy Crawl leading up to Halloween and went all kinds of directions with what I wanted to put together.

Actually I put together one little project and couldn't wait to show you so I posted about it early. Check that post out HERE.
Insanity I tell you..

So here she goes. I was staring at this guy one day.....


and decided it's was time to do more than stick our mail in it and for that matter any little random star wars guys head,  future project stuff, pennies, ponytail holders you name it!

Did you think I was bluffing?  This is the norm right here


It was time to give him an important role on our table so I decided to attempt a Halloween centerpiece.  I bought this block of foam for 40% off at Michaels(about 4 bucks)

I started looking for twigs

 and viola..


I have a tendency to steal from all around the house even if it makes the thing I am stealing from look sad for a bit.  If you already have it use it right?
There was no glue used in this arrangement because I wanted to be able to use it all again for something else of course so I just pushed the twigs in...


Then covered the foam with spagna moss


and stuck the tried and true creepy black bird in for interest.


I searched all over for little bats and spiders but actually had no luck! Can you believe that?  I found spider rings and and all kinds of colorful things but I wanted this to be a more grown up or sophisticated centerpiece.  I ended up grabbing a package of scrapbooking Halloween stickers out of desperation and look how perfect they were.  The 3D effect worked perfectly and the fact that I could just stick them on was just what I needed and I didn't even know it!

I love how it looks like they are crawling up the bowl and it actually freaks me out a little.  I mean every once in a while I think we have a bug problem as I get a peek out of the corner of my eye.


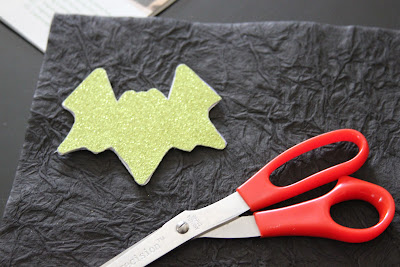
I then made a few bats out of this crinkle paper that was of course 50% off.


I just cut around some glittery bats that I made last week by tracing a cookie cutter(they were intended for a project that I didn't get around to but this gave them a second life I suppose;)


I then used a needle and thread to make a loop to hang them


and then.....I went to town with spagna moss, spider webs, sticky spiders and bats.
 Wanna see what I ended up with?


a huge, dramatic, spooky, yet somewhat sofisticated Halloween tablescape.

Our casa is lacking in light so I had the hubs involve on this one.  Can you see him back there? 


What do you think?  



I can't wait to see what Bonnie
 @ A Wee Meenit has in store for us tomorrow!
Follow along for more fun ideas as we countdown to Halloween!


30th - Break For Project Pink


and if you have a second go visit Marilyn @ 

and see what she concocted yesterday for day 1 of the 

crawl! 


Photobucket

Monday, October 24, 2011

EEEEEEEK

Hey there fellow Homebodies!
Wanna see something disgustingly good?  Are you planning a Halloween party and need that one last gory detail?  You have come to the right place!
A few fellow bloggers and I are participating in a Creepy Crawl that Marilyn from The Artsy Girl Connection has put together to countdown to Halloween.  Day one is here and Miss Marilyn has outdone herself in the gory goodness factor!


Creepy Critter Potion


It looks out of this world creepy to me but oh so good for the mouth!  Go visit The Artsy Girl Connection for the goods on her concoction!

Join in on the fun for the next 6 days as we hop over to visit many more talented ladies and the tricks up their sleeves!


Up next....
Hill Country Homebody
Eeek that's me!
I'm soo nervous!

In case you aren't looking for creepy meet this guy!
Pin It


I think he turned out to be a cute little rustic Halloween greeting at the door.

And oh so easy!
Here's what you do....

First take a short road trip with your crew and go on a hunt..


do whatever little stretching or dancing you need to do to prepare


take a good look at each intricate detail


think about your selection
 (what is mom going to try to achieve with these?)


there's a good one


 look for a way to get a better view 


and bring em home baby!


What a trooper!


Now really..I had no intention to do this little tower o' pumpkins to this extent.  I thought I might put a couple on top of each other but this nope.  I just couldn't help myself they fit so perfectly together! 


So then I thought if I just added a little spagna moss at the bottom it would be more finished.

Then I decided it needed a little more..

I bought a few of these guys which were 1.49 and then 30% off.


then I had to buy some of this lovely chalkboard paint.  This is where we are in life right now...I know I already have some in the garage somewhere...but you should see our garage at the moment! No please don't ...don't go in there..you will never come out! So I just bought more! If it saves a little sanity then I am down with buying it because you can never have enough chalkboard paint right?


I put the wood pennant little guys into one of the gazillion Scentsy boxes that I have laying around to avoid overspray and turned them into a cute little chalkboard bunting.


I strung them together with some raffia covered florist wire that I had actually bought for another project.


I didn't get any pics but you know what to do...Write something on the bunting!

Like BOO of course;)
Since the raffia was wired it was super simple to position it around the pumpkins


you can tell here that I just wrapped it around the stem of the top pumpkin to hold it in place
and then just tucked the rest in the back.

oh and you may notice I tucked a little more spagna moss in between some of these beauties!


I am soo happy with how warm and welcoming this turned out!  Even if it does say "BOO"!


What do ya think?  Have you found a way to display your pumpkin finds?  Do you scatter them all around the house or do you come home with a mission to make something!  Oh and don't worry we did get a jack o lantern out of them too!


Do tell!

See you tomorrow where my old friend spagna shows up again..


Photobucket

linking to:
At the Picket Fence
Blue Cricket Design
The Trendy Treehouse
Someday Crafts
DIY by Design
Savvy Southern Style
Between Naps on the Porch
Dittle Dattle
Sumos Sweet Stuff
Skip to My Lou
The Girl Creative
Todays Creative Blog
Hope Studios
Type A Decorating
Fox Hollow Cottage
Tip Junkie handmade projects

Let the Creepy Crawl Begin!

Tomorrow!


Earlier this month Marilyn @ The Artsy Girl Connection invited me to participate in 6 days of Creep Crawly Halloween ideas, crafts, recipes, whatever my heart led me too essentially!  I was flattered she asked and of course I said sign me up!!
I hope starting tomorrow you will follow along and see what kind of fun and spooky concoctions these fine ladies have come up with.


Here is the line up!


25th - Marilyn (The ArtsyGirl connection) - Introduction and craft..

26th - 1st Kick off Here!

27th - Bonnie @ A Wee Meenit


30th - Break For Project Pink


and to make it even more fun...


the 31st will feature a linky open to all to link up fun 

Halloween 

 projects to bid the season goodbye! So join in if you can!


Can't wait to see what everyone has been up to!


Photobucket

Wednesday, October 19, 2011

Workin with what ya got Halloween Mantel


So I don't know if I have actually come out and said this yet on the ol' blog but we moved!  It is a long drawn out story but we are currently in a rent house and this is her mantel.  I could say she really hasn't been taken care of if I wanted to put a positive spin on her...I am going to choose that road;)

So in order to make her more cozy and a bit more like home we have of course put things on the walls and attempted to warm her up a bit.  (our initial plan was to not even hang anything because we only signed a 9 month lease) But.....we did and you know what?  We are glad we did!  We moved from our 2100 sq footer to this purdy 1500 sq footer and honestly it has been kind of nice!  We essentially lived in the back living room of our old casa because it was cozy and convenient to the kitchen.  When you have three youngsters you need to be close to the kitchen right?  Anywho...the kids(and the "grown ups" love not having stairs and "baby girl" is happy to not have to climb over baby gates.  She is on to other trouble making these days.

All that being said here is a icky phone picture of how I threw the mantel together when we moved in a couple of months ago in all her summer glory(or not).

This was all stuff we already owned(we didn't have a mantel at the old house) and had been spread out all over the house.

You think I'm kidding about the blurry icky phone pick?


I wasn't.

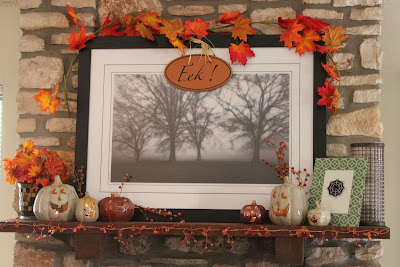
Here is what the Halloween mantel evolved into.  We had this picture in our old formal dining area and to me it had great potential to be eery.  I may never look at it the same:(


The eek sign was an after season purchase from a couple of years ago, the ceramic jack o lanterns were an after season purchase from Garden Ridge 7 years ago.  I have no clue when I bought the random fallish galands.  I don't remember a thing about the fall floral picks either so that means they have been around for a while.  


See the "framed" spider web.  Uh..not so much.  The picture frame was a gift from a friend a few years ago and I just stuck a spiderweb sticker(from a recent project and upcoming post) right on the glass.  Viola!  Classy!  


Aren't the ceramic Jack's cute?!  I have always liked those guys.
How about the random placement of the jeweled garland that I tacked up on the edge?

Seriously if you know nothing about me know this.  I am not a planner when it comes to decor.  I have had several people ask me to help them decorate and I explain that I literally decorate our house by slowly but surely buying things that I find on clearance that I like and then eventually finding a place for them.  I am going to attempt to approach decorating our new house differently but it is hard to teach an old maid new tricks right? (that's not how it goes but in true form I always mess those sayings up;)


Got a spare fall pick?  Shove it behind a pumpkin...
fire hazard?  yes..we don't light these often so we will be o.k.


Got an old but still pretty mosaic vase


that you forgot to take the candle out of years ago when you started putting stuff in a hot storage unit?


stick something in it...nobody knows(well until now) and no one cares.


Even though she was all thrown together..... 


(see how I taped my little "eek" to the picture frame (again classy..especially when it falls and scares us to death)


I still think she turned out just fine!  I think this mantel is happier now.  I am pretty certain her previous visitors never dressed her up so if anything I am happy to make her happy.   Nerd Alert!  I am in a dorky kind a mood can you tell?

So how do you "work" your mantel.  Do you plan it out or throw it on?  Do you have a theme, change it every year or do you just wait for the "big one"(Christmas) before you deck her out?


Do tell!  Make me feel better about my disorder.  Or encourage me to be better.  I will take that too.

Linked up to:


Photobucket