

Hey homebodies!
Let me just say I love mirrors! When we got our first home and I was attempting to decorate with little to no budget I often found myself bringing home mirrors. The hubs was usually like "another mirror..really. Are we that vain?" Well no as a matter of fact I'm not a fan of seeing myself in the mirror on most days but they are so stinkin easy to use to fill up a wall. Especially if you don't mind seeing the reflection of the rest of the room.
Let me just say I love mirrors! When we got our first home and I was attempting to decorate with little to no budget I often found myself bringing home mirrors. The hubs was usually like "another mirror..really. Are we that vain?" Well no as a matter of fact I'm not a fan of seeing myself in the mirror on most days but they are so stinkin easy to use to fill up a wall. Especially if you don't mind seeing the reflection of the rest of the room.
About a month or so ago I ran across this picture on Pinterest.

At first I just noticed and liked the symmetry in the picture. I have also been loving the look of having two tall pieces of art on either side of the bed instead of a piece above the headboard.
Then...my "wheels" remembered the mirror we have in the kids room and I thought " I need a good reason to go to IKEA and buy
THIS
Ram Mirror
THIS
Ram Mirror

10 Bucks!
And then...I got all wacky and thought I would decoupage it with some fancy tin foil to give it the silver look without having to paint(which to me means taping and being careful not to get the mirror all funky)


Well..It was still messy and time consuming so instead I went even fancier with
this


I searched for some circles..The kitchen always comes through for me here.


Then I applied a thin line of hot glue because that is what I had(we shall see how it holds up)
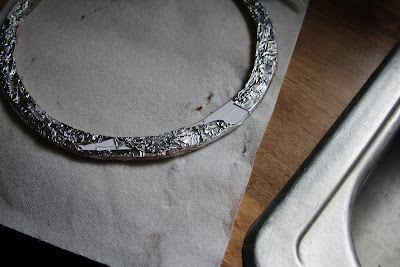


Oh yes I'm classy like that.You can do anything with Duck tape right? There isn't a thing I won't try to get a certain look quickly and cheaply;) Did you know there is such a thing as Color Duck tape? There are all kinds of fancy patterned ones too. Who knew?

I know now your thinking why on earth didn't she just paint the mirror silver? I'm thinking that now that it is all said and done myself but I like trying new approaches so I had to finish it and see.

It doesn't look too horrible does it? Really when you think about it it doesn't have to be perfect. These will probably be in a place that no one really gets near if they are on the sides of your headboard anyway.

Next up I needed some circles for the inside of the mirror(s).
After searching for the perfect random material I finally decided that a piece of foam board would do the trick as long as I could cut it without destroying it.

I searched for some circles..The kitchen always comes through for me here.

I then used a utility knife to cut through. This was a little time consuming and they definitely didn't turn out perfect but I was planning on covering them anyway.

I laid them out to make sure the design worked. You'll notice it is a bit different from the picture...Didn't have circles in my kitchen that big;)

Then I added a bit more class to the project and covered them in foil.

I brushed a light coat of copper latex paint over the circles and the mirror to patina it up a bit. On a side note if I were taking the same approach(foil and duct tape and all) I would use a rub n buff to patina it instead. I don't think the latex is going to hold up very well on the shiny duct tape surface.

Then I applied a thin line of hot glue because that is what I had(we shall see how it holds up)

Applied the pattern and viola!

I have seen these mirrors somewhere online for around $450!
Don't get me wrong I am sure your $450 buys you a bit more class but hey I'm willing to be a little bit country if it saves me $435 bones.
That being said...If I wanted to do a little more work it would totally be worth it to cut some thin wood into these shapes and either stain or paint this whole project. Honestly I would recommend it if these will be in an area where people get all up close and personal to them. But...don't you love it when you don't have to break out the power tools?
I'm linking up this project to
The pinterest challenge hosted by
Sherry @Young House Love
Katie @Bower Power
Anna @ Anna White
Erin @ House of Earnest


17 comments:
Pretty amazing. Great job.
This is sooo cute.. So beautiful how it turned out : )) You are so crafty Jess.. Great tutorial.. Hi girlie -- sneaking in as usual to say hello.. {please link and share this goodie at my Pin'Inspirational Party today if you have a moment.. TY TY ..Wishing you a lovely start to your weekend.. }
Hi, I love that you are willing to "just try it". I tried some chalk paint that I made myself recently...ha! It did work but wht a mess. I followed you....please visit me at www.bleak2unique.com and follow me too. Love the blog, Lori
oh wow i've seen similar for that price and i thank you for this tutorial.
Would luv for my readers to see this awesome idea, will you please join our weekly party at
http://www.passionatelyartistic.com/2011/11/thanksgiving-showcase-tutorial-with.html
have a great crafting weekend!
Maggie
http://passionatelyartistic.com
Wow...amazing transformation! I would love for you to come share at our link party...junkintheirtrunk.blogspot.com/2011/11/link-it-up-wednesday_08.html
Heidi @ {Junk in their Trunk}
Great job! I love how creative you were in getting the look you wanted!!
evie @ brown paper packages
So adventurous! I like how it turned out. (Did you make a second one to go in your bedroom?)
Hardwork, talent and creativity has no price. Bravo!!
that's a pretty nifty idea
for creating a little mirror pizzaz
on your own
the circles and duct tape are ingenious
thanks for sharing at fridays unfolded!
alison
Well I usually prefer the rustic look, looks good. Kathi
Seriously? This is brilliant! I've been looking for some similar mirrors, and I never would have had the insight for this! Thanks for sharing!
What creative thinking! The end result is lovely!
I love it! I'm all for doing things "the red neck way" when it saves $400+ dollars!! Your mirror turned out great. I would love it if you linked up to the Head to Head Showdown, going on right now at www.icantstopcrafting.blogspot.com
~Jen
I LOVE the creativity & resourcefulness of this project! And the finished result is great!
I featured this on my blog today! :)
http://christinasadventures.com/2011/11/sunday-features-46.html
I'm also pinning it here:
http://pinterest.com/christinasadven/20-below-features/
Come grab a "featured" button! Thanks for the inspiration! :)
This is great. I love the use what you have approach!!
Now this is what I call being creative! I love it. Ballards Designs eat your heart out!
Turned out great, Jess!
Thanks for commenting.
I'm following your blog now! : )
~Abbie (www.fivedaysfiveways.com)
Post a Comment