Showing posts with label Art. Show all posts

Monday, February 10, 2014

Finally..A Tour of the Powder Bath

Did you think I would never ever post pictures of how the hows turned out after we built?  I've wondered myself.  I've had a few requests for a House Tour since the construction finished up last May  but honestly I just haven't had it in me.  
Today is different though.  I thought "o.k. I WILL post some pics of the bathrooms today".
And then…I couldn't find my camera.  Seems the hubs never in a million years thought I needed it today and he took it with him to work?  Huh.
Anywho…So to make myself feel better I took some fancy I phone pics and I WILL most certainly still show you the powder bath and how it is slowly but surely being decorated.

Here she is..
Wait.  Don't leave yet.  She's cute but once she gets a little lipstick she's more fun.  Read on.


It's very difficult to get pics of powder bathrooms don't you think? 
We installed the cabinet and sink ourselves from IKEA and I can't remember for sure where the faucet is from but I believe it was online at Lowes. The light is from Lowes as well..I think:/  (I kid you not when I say I've tried to block out the whole experience and apparently I'm pretty good at it)

I love the mirror I found at Ross one day.  Can you say SCORE!  

So the room was pretty blah.  We haven't ventured into painting anything and I'm not positive about the direction I want to go in here but I came across these books on Amazon and it helped a TON.


Ashley and Jamin Mills from the Handmade Home put together these awesome books that include 40 prints that will fit in any 8 x 10 frame with all kinds of matting possibilities.  All of the prints work together beautifully and I can't wait to use them all throughout out home as we finally start hanging things on the walls!


As you see above I first found some frames that I had stashed in our guest room AKA decor storage room.

See.  

We have no bed for company but you can shop in here if you like.  Oh snap I forgot I had those purple peacock pillows!  Woohoo!

I digress.  So as you saw above I played with the picture layout on the floor first and then started hanging.  No measuring required.  My philosophy is just to wing it which would drive some batty but I don't have the patience for measuring.  If it doesn't look right just move your nail over.  
Guys remember these are phone pics..Lame

So that's how she sat for a while and then I remembered I had my old dresser my parents bought me when I was two that would be fun and funky and brighten up the place.


I painted the dresser for my now 6 year old daughters nursery and now here she sits all fun and bright in out powder bath. 


As you can see we also received another addition to the family for Christmas.  My inlays got us the fab marquee letter H and it fits just fine in here for now.  Mr. marquee may end up in the playroom when we get around to doing something in there.


So there you go.  A teeny tiny peek at how one room actually turned out after construction and is slowly evolving into a homey little space.  Next up…I hope to show you the master bath but I need my real camera back to do it justice.  


Photobucket

Monday, May 16, 2011

Trendy Thrifty Laundry Art

Hey remember me...I was soo gung ho about blogging for a while and then I fell off of the face of the blogosphere!
Let me reintroduce myself as the girl who seriously has way too many projects on the brain and way too little time to execute. I predict that every once in a while I will mentally need to step back and re-evaluate my priorities, my "free time"(aka..nap time), and my heart and soul.  I want this to be a place that I can document the little unimportant but fun and somewhat fulfilling projects that pop up in my little brain to make our house a cozy home. While..... not neglecting what truly makes this house a "home" which is my hubby and 3 precious laughter inducing, tear producing, bear hug giving , hair pulling outing children! 
So now that I cleared up where my mind has been...
Here is a thrifty little project that I have been tinkering with that finally came to fruition this weekend.  I have been bothered, actually really bothered(it is an illness that many of my fellow bloggers have) by the bare wall in my laundry room.  We have very sloooooowly tried to warm up the room. I am hoping to post about some of the things we have done in the laundry one of these days when I find my before pics!  So for now just this little project will have to do.  Anywho...I had been looking for what I call "laundry art"  I wanted fun, vintagey, maybe even funky art about laundry because well..where else can you put fun, vintagey, funky laundry art?  I was looking for colorful yet cheap and just hadn't come up with anything that was floating any of my boats really.  As I attempted to stimulate my creative side at Hobby Lobby with the kiddos(I usually forgo bringing the kids anywhere where I need to be able to think) I came across these.

Yep clothespins


Correct me if I am wrong...that is what these were used for at some point right?  Fitting for laundry art aren't they?   Well as I have mentioned before I have had a longtime love for a good ol' sunburst.. I am having trouble linking to them at the moment but I have mentioned my love for these fancy wall fillers a couple of times in previous posts.  So I went looking for circles..
and found these....

 1.99 for six 8" cake boards
And then I found these lovely little wood circles too so I bought both because I wasn't sure what would work best.  Just fyi I have a tendency to think very little about the execution of a project..I prefer the buy it and if it is or isn't going to work take it back approach hence why I have 4 bags of "stuff to take back" in the car at the moment.  Problem is finding the time to take it back..Need to work on this!
 When I got home I realized I had purchased two different kinds of clothespins.  Ugh!   Turns out it worked to my advantage.  Again, not a planner but I am just going to roll with it.
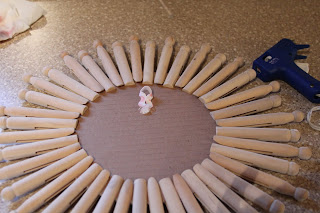
See how one is pointed and one isn't?  This actually helps when varying the height of your "bursts"
In this pic below I was playing with the pointed ones and varying the height.  This was before I knew I would run out of these and find shorter stubbier ones in the second bag.
Here I was playing with the clothespins that most of us know a little more personally but I didn't like the more kitschy look that it gave the project.
Here it is ready for a coat of white spray paint.  I got lazy and only coated the front.
Remember this "cirlce" of wood?  I painted it with Americana craft paint in Spa Blue and hot glued it to the front of the sunburst after it was painted.
Then I dug around for some ribbon and hot glued a loop to the back to hang it.


And here she is!!!!!
Kind of fun and quirky with a sophisticated side right?
Now she isn't bright and bold but I decided I need to hold back a bit since we will have the house on the market soon(I will save my boldness for the next laundry room).  
I do think she turned out super cute though.  Have you guys done any quirky laundry room projects?  Don't you think it is the one place where you almost feel like you can get away with something a little more out of the norm because it is really only you that sees it?  I can't wait to explore all my color options when we move to the new house..It will be my little "office" so to speak so I am hoping to step out of the box with color there.  But until then this little project helps keep me from being annoyed at the blank wall!

this project was linked to the fabulous parties on the right sidebar and since I need to update my list..
these great blogs too!


Photobucket

Monday, April 18, 2011

Huge Yet Inexpensive Art

A while back I posted here about our living room revamp.  I have had a few questions about the art behind the sofa so let me take this opportunity to turn that into a blog post!  Otherwise today I might be posting about how to get rid of the "tee tee" smell in the bathroom that seems to be ever present when you have preschool aged kids.  Or how to keep your lab from shedding, or how about how to load the dishwasher with out little 16 mnth old people grabbing for the knives or climbing onto the dishwasher door.  Those posts would not be informative at all...Just a multitude of questions from me really. So let's move on to a more lighthearted subject.

Big /Huge Inexpensive Wall Art


O.k. Before I go any further...forgive the overzealous use of watermarking here...Not sure what happened but don't have time to fix it at the moment...Mommyhood is calling;)

I know lots of people in blog land and elsewhere struggle with how to fill this massive space of nothing behind the sofa.  You can spend a pretty penny decorating this space if not careful.  Here is what we came up with that suited our thrifty budget and provided something a little different that suited us a bit more.


We purchased 3 of the precut 2 x 4 sheets of wood that you can find at home depot, lowes, etc..
I believe they were about $10 a piece.  This pic is no good but I was trying to show the dimensions and it looks like it is 1/2 inch thick.
We stained it with some wood stain we had on hand.  We then planned out the design.  I knew the look I wanted so we just used cans to draw some perfect circles and plotted out a good flow between the two panels and drew it all on with a pencil.


Then came the messy and time consuming part of using the dremel to carve out the design.  This really was time consuming and the hubby just did a little bit at a time after work.   This is not our dremel layed out all nicely  but I think he used the bit that is the 4th in from the right.   

Here are a few close ups of the detail.


and a side view..

And the finished project!  


We attached the little alligator teeth looking picture hangers on the back and used the ol' stand back and see method to get them all lined up.  We actually attempted to sell these on etsy but due to the time to carve and the cost to ship it was a hard sell so I guess we will just keep them for ourselves!
 I have learned to love the precut wood section at home improvement stores.  There are endless opportunities for wall art without having to break out the saw!  Have you done anything similar to this?


Photobucket


Linked to the great parties at:Tater Tots and JelloGreen Door Designs, Home Stories from A to Z

Monday, April 11, 2011

My What A Pretty Thermostat You Have

It's official..my priorities during nap time are all messed up..  Really..who needs a pretty thermostat?   Well this little white thing has driven me crazy for the almost 4 years that we have lived in this house.  I guess it could have been in the middle of the wall and that would have been worse(or would it?).  Not to mention that this wall is just short enough that a sofa doesn't fit on it and allow for another sofa or any reasonable seating to be on the wall next to it.. See more about the layout of this room in this post. So I have stared at this blank wall for years now..
Yes I think I could have figured out some decorative shelves and just put something in front of it but this whole..."we are going to move soon" thing has really kept me from wanting to spend the money on or put the effort into really addressing this blank space.  So we just kept it simple for staging purposes.  

Here is a side view so you get the idea of the thickness because if you have a huge chunky thermostat this may not work for you
So I was at Hobby Lobby a couple of weeks ago and came across this
It is just a little wood box with a sliding lid..that comes all the way out. 
I had often thought that I would be able to paint a canvas and hang it over the thermostat but most canvases aren't thick enough, wouldn't allow air circulation and they aren't that cheap either(in the grand scheme of things they aren't expensive but I like most of you am cheap thrifty).  So when I saw this I had a lightbulb moment.  As you can see in this post about scrapbook paper I have a thing for decorating with it.  There are so many beautiful papers that I just can't resist that isle even though I am far from a "scrapper".
You can see in the above pic that I had placed it across my wood box thing to make sure it would completely fit over all the sides.
So with a 3.99 wood box, some .59 paper and some mod podge that I had at home

I ended up with this!
Now my plan is to attempt to drill some holes through the top and maybe the bottom(although there is already a small gap on the bottom where I slid the top off) to help with circulation so it won't affect the way the thermostat monitors the temperature..(I hope!)  I guess we shall see how it affects it.  I literally just applied the mod podge to the box, folded the corners like I was wrapping a present and cut the excess paper off.  Ihad originally planned on adding a little hinge to one side so we could open it up, and then I thought I would just place a nail above the thermostat to hand it, but ended up just hanging it on the thermostat to avoid putting anymore holes in the walls.
That being said...this tiny piece of art on the wall looks uber silly all by itself so I still have some work to do to balance it all out but it is a start!  The possibilities are endless.  I have seen boxes like this that are part of an "art wall" so to speak for much more than $4.50.  Adding more to this could be fun!  I will keep ya posted! Ha! 
Photobucket