Sunday, December 18, 2011

Cha cha cha changes

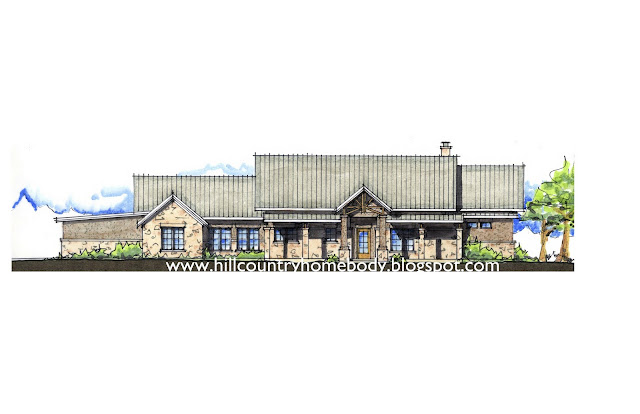
Remember a few posts back when I shared our first color drawings of the beautiful home that Wilson drew up for us? So fun to see what you have been thinking of building come to life on paper with details, color, and shadows right?


Well what is not so fun is the realization that you can't make it a reality because of HOA requirements and oh you know...the budget.  Truth be told when we received a preliminary quote for the beauty above we were actually just at our max of what we wanted to spend and that was with a lot of bells and whistles which we knew and assumed we would probably have to nix and DIY a little at time in the future.  Sadly this board and batten look is not o.k. in our neighborhood unless your house is 3,000 sq feet or more and ours will not be.  Believe it or not for a split and possibly irrational second we thought "hmm you mean if we added a couple hundred sq. feet we could actually save money because we wouldn't have to have so much stone on the exterior".  Stone is pricey people!  But...we don't want a house that big to clean and heat and cool.    Actually I wonder if someday we(we meaning all of us) will not even look at stone as an option anymore due to there being so many more green and less expensive ways to clad a home.  One day HOA's in our area may rethink what is acceptable as long as it is not depleting the value of homes in the neighborhoods.  People want efficient, green, pretty, and inexpensive ways to build spaces.  Us included!  So anywho...IF we were to ever leave this house that we haven't even started on...(did I dare say that?) then I think we would have a ton o' fun playing with other materials.  But for now this is how we have gone about changing some things up to meet the requirements and changing some details that I mentioned in that previous post about the front porch area.
Ta da!  She is pretty too isn't she!!  We changed up the roofline a bit to add more interest and in doing so  went to 9 foot ceilings everywhere except the kitchen/living area.  We also obviously added more of a front porch.  We have always loved this look over an entry...

 Sources of these 3 pics is unknown(before the days of pinterest:) and I wasn't savvy enough to note where they were from so if you know please advise!  


In the drawing you will see many of the columns are stone and due to budget those will be changed to cedar clad posts.  The materials have changed to a stone and stucco mix which unfortunately is more 
cha ching:(

Here is a drawing of how the back of the house did look
and now (not in color so a bit harder to compare)
Not a huge difference but did replace the board and batten with stucco and will clad the columns in cedar here to to save moola. 

Here are the previous side views

and here they are now.  You can see we have had to scale her back a bit in the ceiling height and window category.  Oh and you know that side of the master bedroom was my favorite right? :( Boo and oh well!  I will get over it...Actually done...  I'm over it.  We don't have the time or the money to care too much at this point.  I still have those awesome square windows that I can't do without! 


We have to get this baby done soon...our lease is a tickin and little man starts kinder soon!  No matter what it will be our home and we will fill it with noise, love, fun and stress and life and I am oh soo grateful for that!  Don't get me started I am on a teary eyed hold on to my family and try to enjoy every moment ride right now.  As I should be!  


So this may be it?!  Our future home...We think she is pretty! 
 But...Happy inside is what makes her pretty!(there I go again;)  Seriously if I could type tears and a swelling heart I would.  I am all hormonal or convicted or something.
We shall see....at this rate we may just have to sell the lot and grab us some rusty old metal and start that whole "green building" "off the grid" life I dream of;)



Photobucket

Wednesday, December 7, 2011

I would say come on in

but.....we don't live here anymore! In an effort to do a little less when it comes to decorating for Christmas this year we have opted not to put this bad boy together again at the rent house. I did love this garland though. I think I loved it a lot more than hubs did because he usually ended up being the one to nail it to the stone and do all the hard work while I was typically doing the tree. He is (not so secretly) happy to keep all these goodies in their storage box. Just this year though dude!   I digress..It really welcomed us into our home and it was fun to drive up and see. That sucker was bright!


Ok forgive my bad photography here!  We had just received our new camera and didn't have a clue how to take pics in low light.  Not that I have it all figured out now either but still...


Can you  even tell what is going on here?  I didn't think so.

Thankfully for some reason I did get this close up though. I wasn't blogging about things other than family stuff on our family blog last year so before after and during pics are lacking here but you can see that we just used some of that grapevine that you find all rolled up at Michaels or Hobby lobby and attached that to the stone.  This stuff is a little hard to work with and get to stay in one place because it is so thick and twisted so hubs nailed it in place.


Then we twisted some garland around it, added a gazillion small and large white lights and stuck with  simple red and white ornaments.  When decorating outside I personally like the bigger the better philosophy with ornaments so they actually show up from the street.

Funny though...as I look back this garland was so bright you could hardly see the ornaments.  Good to know!
So that's it..a strange post about last years door.  You use what a got right?
Hope your all having fun getting into the festivities of this fun time of year!
This year I'm trying to focus on sitting on the couch more with the kiddos and hubs and not letting all the excess and bright lights take away from the reason our family celebrates!
Merry Christmas!


Linking to:
Photobucket

Monday, December 5, 2011

Simple is hard to do


With Christmas fast approaching I typically get antsy about trying to make something, at least one something, whether it is something to make the house a little more festive, cookies with the kids, or a gift for someone.  This year is no different except my heart is tugging at me saying "take it easy,  your crammed in this rent house with no room to create, enjoy the moment and don't make a mess if you don't have to".  But....I just can't help myself!  No really...the truth is I have this party..Wink wink Jonna.  This fabulous party that another one of my sweet friends hosts every year(yes I have some party throwin friends).  
Here is the invite!  Such a fun way to get motivated to create!

As the days cool down and the Season draws near,
Let’s have some fun girl-time with friends, food, and good cheer!
Bring a fun homemade gift, wrapped and ready to trade
(or go out and buy one if you just don’t do homemade).
So offer sweet dreams and kiss the family good-night,
Then come out and celebrate - we'll be merry and bright!
Invite your friends and let’s get to know each other better. Be creativewith your gift for exchange your ideas are limitless (up to $15 value, please).


So in an attempt to do something quick and thrifty I now have this..


Ha!  I have three different things going on here...none of which are complete.  I am a scatterbrained crafter fo sho.

See that plunger looking thing there?  Um I nixed that project...It was going to be a tree and then a reindeer and now its a plunger;)  

So here is where I ended up and I don't know that it's finished..but I can't find my ribbon stash(it's in the "storage" aka the garage we can't walk into) and I can't decide if I am willing to brave Michaels for one more ornament wood thingy.


I started by buying some of this glittered card stock at Hobby Lobby(for my tree project fail).  I can't get enough of this stuff.  I was lucky to find it at 1/2 off when I needed it.


 I also brought home some Folk Art black metallic paint for the "plunger" project.

Days later...I came across these little wood ornaments at Michaels while I was looking for something else..What that something was I can't remember.  Seriously have scatterbrain issues.  

This pretty curvy gal was 1.49 and then 1/2 off!

I decided after much goofing around with other possibilities for this that I would keep it simple and make a garland, swag, or bunting...whatever you want to call it.  Actually I don't know what bunting means..I need to look that up!

So I asked the hubs to go into the deep dark unknown of the garage and figure out a way to make some holes to hang said garland.


Oh and luckily I had an impulse buy near while in the checkout line and bought this package of 3 Ho's for half of of 1.99(giggle here) and a santa hat that had holes in them so they were absolutlely perfect for the "garland".

I went ahead and painted the back of the three ornaments with the metallic black paint to give it a more finished look without having to go buy more paint.  If I had silver or red I would have gone that route but I'm glad I didn't because if I do want to keep this on the mirror the black keeps the back from being too distracting.

I decided to leave the side I was going to decoupage without paint although it wouldn't be a bad idea to paint both sides in case your paper isn't lined up just right.

I traced around the ornaments onto this awesome paper...This is by far my favorite and I wish I would have done the whole thing in this beautiful paper!

Make sure to mark where your drilled holes are too.  I used a hole punch to make a clean cut.  Then whipped out that mod podge and went to town.

Since I can't find my ribbon stash....I used leftover raffia from my little mummy votive project in October so I could see how it looked all together.

And Viola...Here she is on the mantel.  


I think I am going to go look for a better ribbon option if I have time but I think she turned out simple and even a little mod which I love!  
You can't really tell in these pics but all three papers are different...I think I will rearrange the order of the ornaments when I rehang them.  I am feeling a little off balance with my favorite paper being on the end;)  Who knows...I might just totally change this again before the party;)


Update::::::::
I did find time to go get some ribbon and of course moved this little baby again.  I think I like it better with the red ribbon..Don't you?


Linking to:
Bower Power
Under the table and dreaming


Tip Junkie handmade projects